Sketching Tutorial: Graphite Paper, Blending Stumps, Tracing, and The Shading Flip Technique
A sketch is a question about your source image,
how will it look like, how is the light, how does it scale.
But sketching is also a great way,
to create many fancy drawings.
Art, this day an age,
begins with a cute original photo that you took.
Personally I believe,
that cuteness or silliness is a must.
Art is not just about the image,
it is about the best kinds of feelings.
Get an Drawing Board,
and protect it from moisture.
Drawing boards are made very light,
they may have honeycomb structure on the inside.
And get out of your house,
never draw alone.
If you have nowhere to go,
go to a coffee shop.
Avoid sketching paper
and just splurge on the thicker 12x18 Drawing Paper.
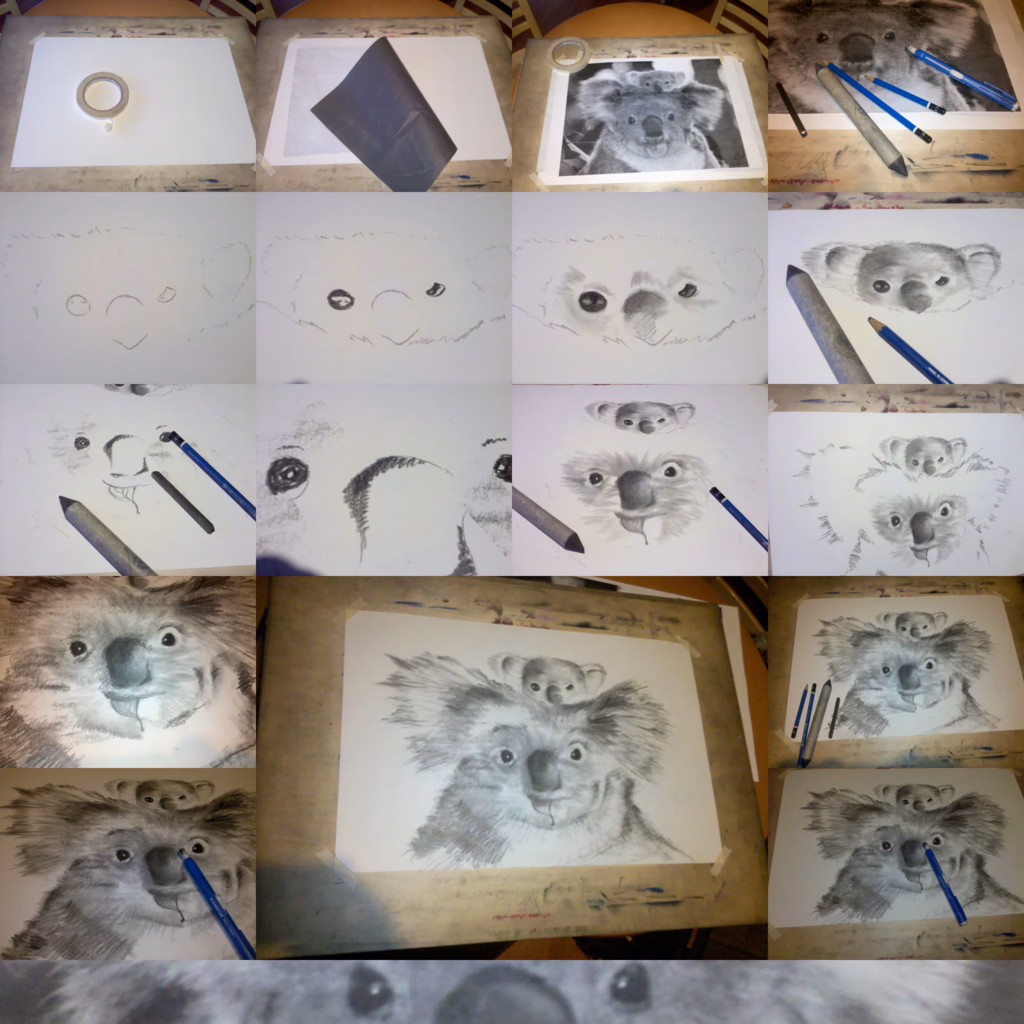
Attach the paper to your Drawing Board with painter's tape,
or low tack drafting dots.
Lay down a sheet of Graphite Paper,
that you can easy erase with an eraser.
And then apply your source image,
just print it out on four sheets of 8x11 and attache them together.
I used to visit an office print shop,
and I printed out my images on large paper, but that is not needed.
If you don't have a printer,
get a cheap laser printer for a $100.
It is really important that you use painters tape to attach your print out,
so that you never have to worry about it moving as you trace.
The graphite paper you have left, maybe smaller than your drawing paper,
so you may need to move that one around as you trace.
You will need a Graphite Pencil Kit with an eraser,
and blending stumps, which are rolls of paper that help you smear out or blend graphite.
It does not make a difference if it is expensive or not,
pencils are pencils, and you shouldn't pay too much.
The thing about art pencils is that they are of different shade or softness,
the #2 pencil we usually use in school is just an HB pencil, one of a dozen variations or so.
It is not a good idea to draw with an #2 pencil,
because that is just one shade and you can't make it darker.
Art pencils have lighter and darker colors,
the ones that start with H (H2, H3, H5) are harder and lighter, and the B ones (B2, B3, B4) are bolder and darker.
I sometimes use a graphite stick to fill in a lot of area,
but that only works well on really flat art boards.
Graphite sticks are like drawing charcoal,
but a bit smaller, it is just a square stick of graphite.
Sometimes it is useful to get an eraser shield,
especially if you want to reflect the sun in eyes that you darkened already.
Eraser shields work best with battery powered erasers,
which are kind of useful, especially when adding light to a near compete sketch or drawing.
I am ashamed to say, it took me a while to figure out what eraser shields were for,
somehow, the thin shiny metal with curious little holes, was very mystifying to me.
If you want to look extra nerdy, get a Drafting Brush,
to brush off eraser fluff from your drawings.
I never had the courage to use one my self,
but the more I think about it, the more sense they make.
Then just start tracing with a pencil, outlining large dark areas,
marking the reference points you may need.
If you don't want to draw on your print out,
use a Ball Stylus normally used for working with clay.
Even after I am done tracing,
I sometimes leave the original still attached to my drawing board.
Not just because I may need to add something,
but because I like flipping back and forth between my drawing and the original to see if the shade is correct.
I call it the shading flip technique,
and it helps you keep the tones just right.
Just tuck the original behind your drawing board,
until you are almost done.
And then add the pencils, and blend with the blending stumps,
the big blending stumps are the best in my opinion, #6 or even #8.
And then mediate,
enjoy the relaxations of art, and occasional smiles of strangers.
If someone likes your drawing, and you are almost done,
consider giving it to them, just sign it, and let it go.
If you are going to do that, bring big envelopes along,
I used to reuse the ones I had my original print-outs delivered in.
This way the stranger won't have to worry about making them dirty,
as they walk them back to the car from the coffee shop.
You can make a business out of it too,
have people send you photos of their relatives or pets.
Just help them understand that a good photo,
is one that looks great in black and white.
Strong light and bright areas;
and deep dark shadows often make for best source images.
If you ever get stuck,
gently copy the shadows and light from a similar photo.
Using this tracing and shading flip technique,
you won't have a problem with proportions and tones at all.
There are very few nicer ways to spend a winter,
then making silly drawings at a coffee shop.
Links
- Drawing Board https://www.amazon.com/s/ref=nb_sb_noss?url=search-alias%3Daps&field-keywords=art+drawing+drafting+board
- Drawing Paper https://www.amazon.com/dp/B00CLDFNHE/ref=twister_B0842SWPS6?_encoding=UTF8&psc=1
- drafting dots https://www.amazon.com/s/ref=nb_sb_noss?url=search-alias%3Daps&field-keywords=Drafting+Dots
- get a cheap laser printer for a $100 https://www.amazon.com/Brother-HL-L2300D-Monochrome-Printer-Printing/dp/B00NQ1CLTI/
- Graphite Pencil Kit https://www.amazon.com/s?k=art+graphite+pencils&ref=nb_sb_noss_1
- graphite stick https://www.amazon.com/s?k=graphite+sticks&ref=nb_sb_noss_2
- eraser shield https://www.amazon.com/s?k=eraser+shiled&ref=nb_sb_noss_2
- battery powered eraser https://www.amazon.com/s?k=batery+operated+eraser&ref=nb_sb_noss_2
- Drafting Brush https://www.amazon.com/s?k=drafting+brush&ref=nb_sb_noss_2
- Ball Stylus https://www.amazon.com/s?k=Ball+Stylus&ref=nb_sb_noss_2
- big blending stumps https://www.amazon.com/s?k=big+blending+stumps&dc&ref=a9_sc_1